
Wireguard setup Openwrt
The amount of tutorials out for setting up Wireguard on your Openwrt router are either incorrect or over complicated.
I’ve decided to collate these and create an easy to understand walkthrough to get a simple Wireguard VPN set up on your router. I will be using the wireguard app on Android as an example in this tutorial but others should be similar.
With advice from some of the members of the openwrt forums (thanks to cpunk) the below details have been updated to be more accurate.
Install packages
SSH into your router and run the below:opkg update
opkg install kmod-wireguard luci-app-wireguard luci-proto-wireguard wireguard wireguard-tools
Add the interface
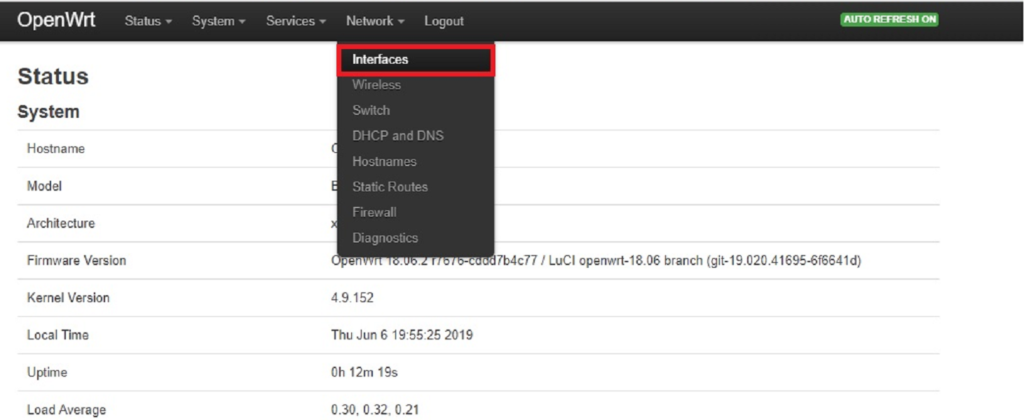
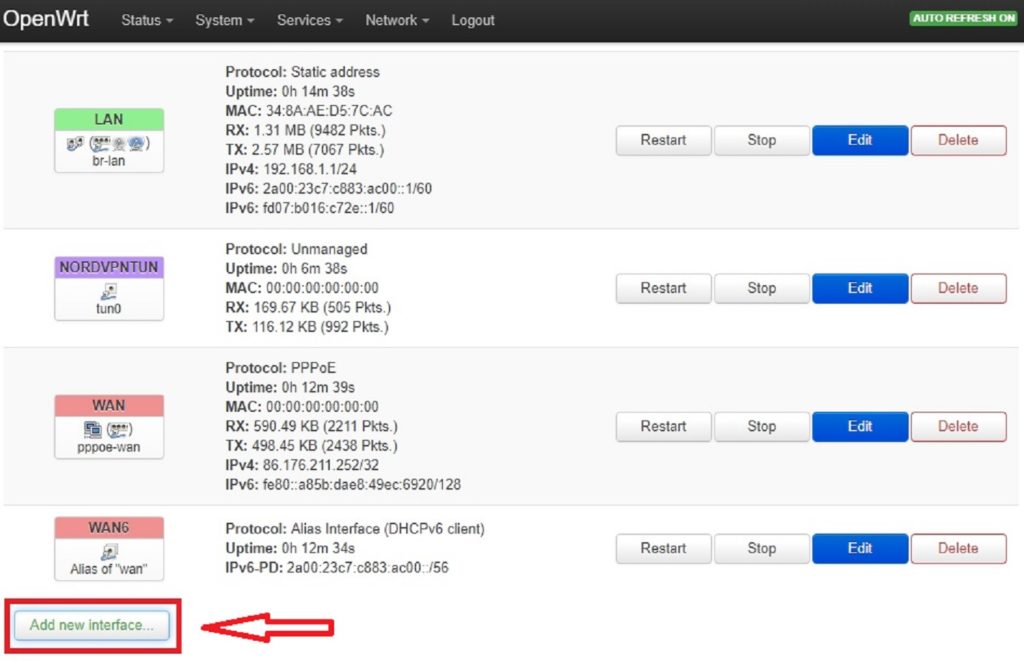
Login to your router and select Network > Interfaces and then select Add new interface.
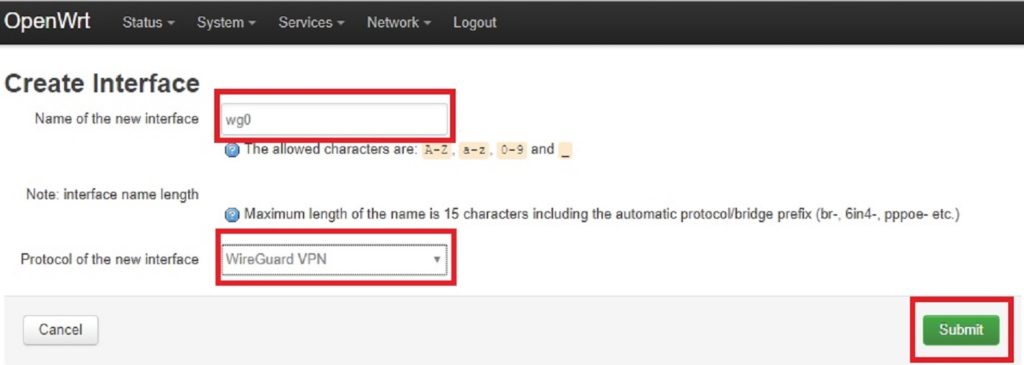
Name the newly created interface wgo, select Wireguard VPN as the protocol and press Submit.
Generate key pairs
From SSH run the following:
mkdir -p /etc/wireguard
 wg genkey | tee /etc/wireguard/server-privatekey | wg pubkey > /etc/wireguard/server-publickey
 wg genkey | tee client-privatekey | wg pubkey > client-publickey
Grab the keys
There should now be two files in /etc/wireguard, one called server-privatekey & server-publickey. Open these files to view the keys and make a note of them.
Wireguard app
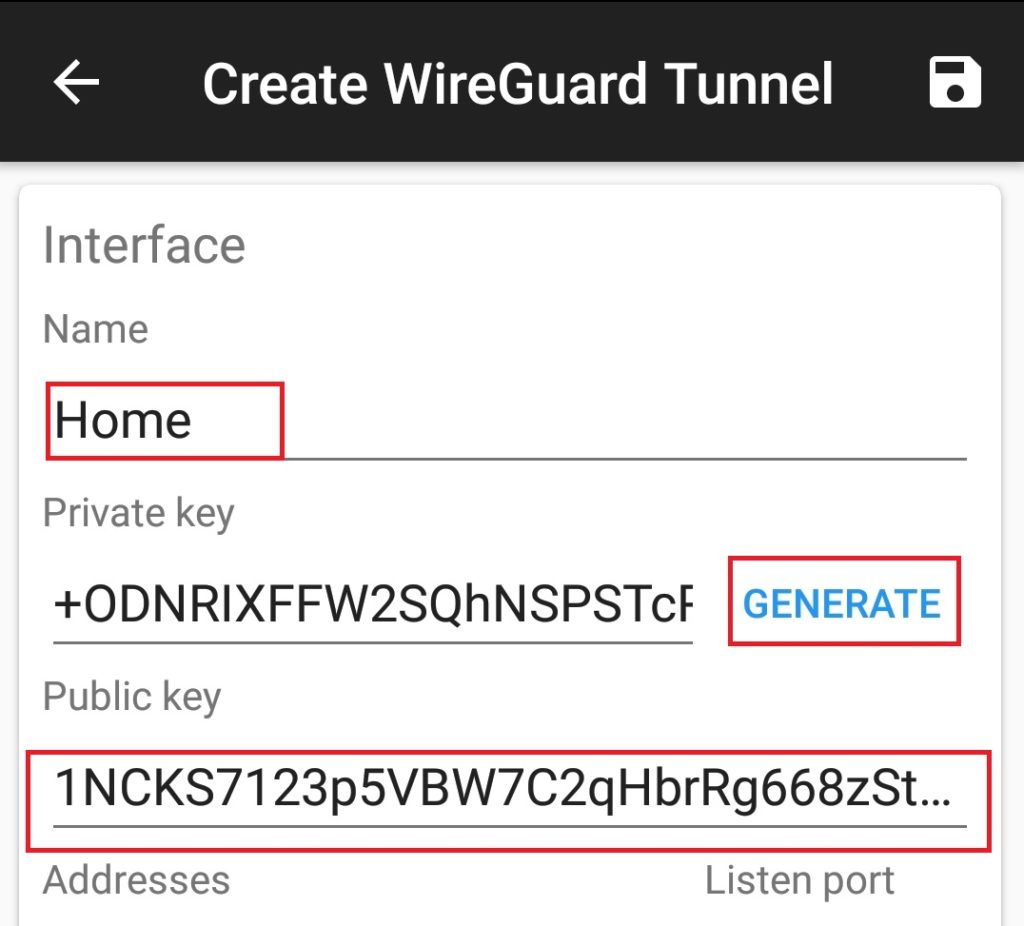
Download and open up the wireguard app on your device and select the + icon and select Create from scratch. Name the Interface, click GENERATE. Copy the Public key somewhere as you will need this to enter into the Wireguard interface on your Openwrt router .
Configure the Openwrt Wireguard Interface
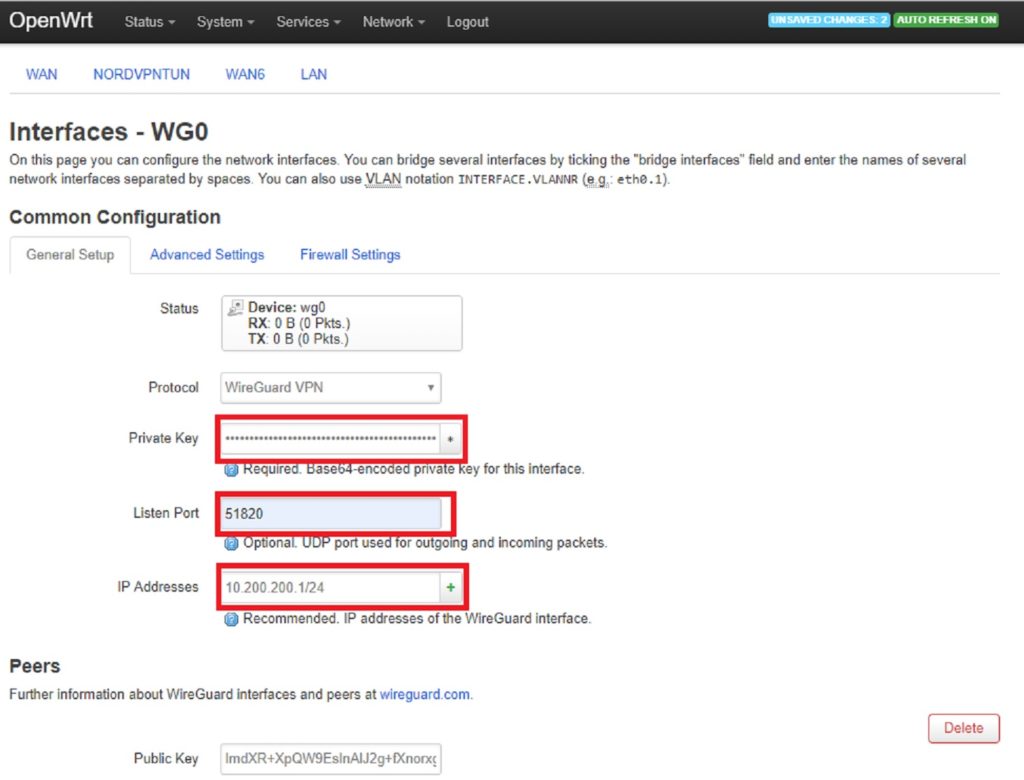
In your router, head over to the configuration page of wg0 interface. From the general settings section, paste the server-privatekey you obtained from /etc/wireguard earlier into Private Key section, set Listening port to 51820 or any unused port you like.
In IP Addresses, choose a subnet IP CIDR, for example 10.200.200.1/24 . This will be the subnet of your VPN
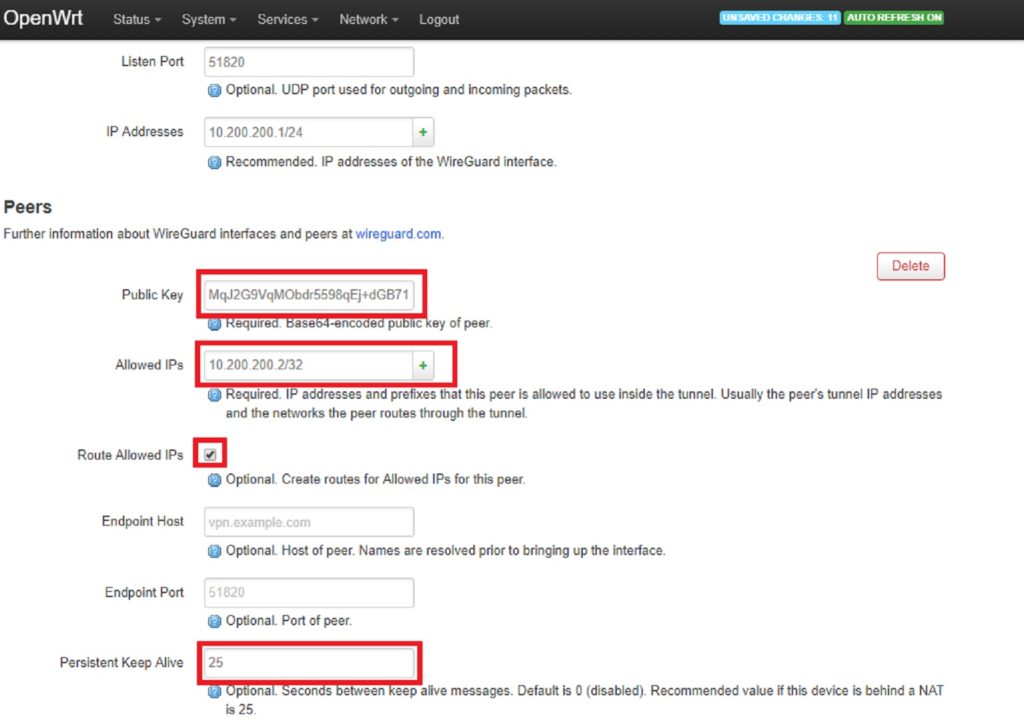
In the PEERS section click Add and paste in the Public key you obtained from the wireguard app. In the Allowed IP’s section you’re indicating what addresses are reached through the tunnel to this peer. In our example we only want to send traffic to the one client’s address. To do this, pick an IP address for the client in the subnet you previously chose, and use /32 at the end. For example 10.200.200.2/32. Next, make sure Route Allowed IPs is checked and set Persistent Keep Alive to the recommended value of 25.
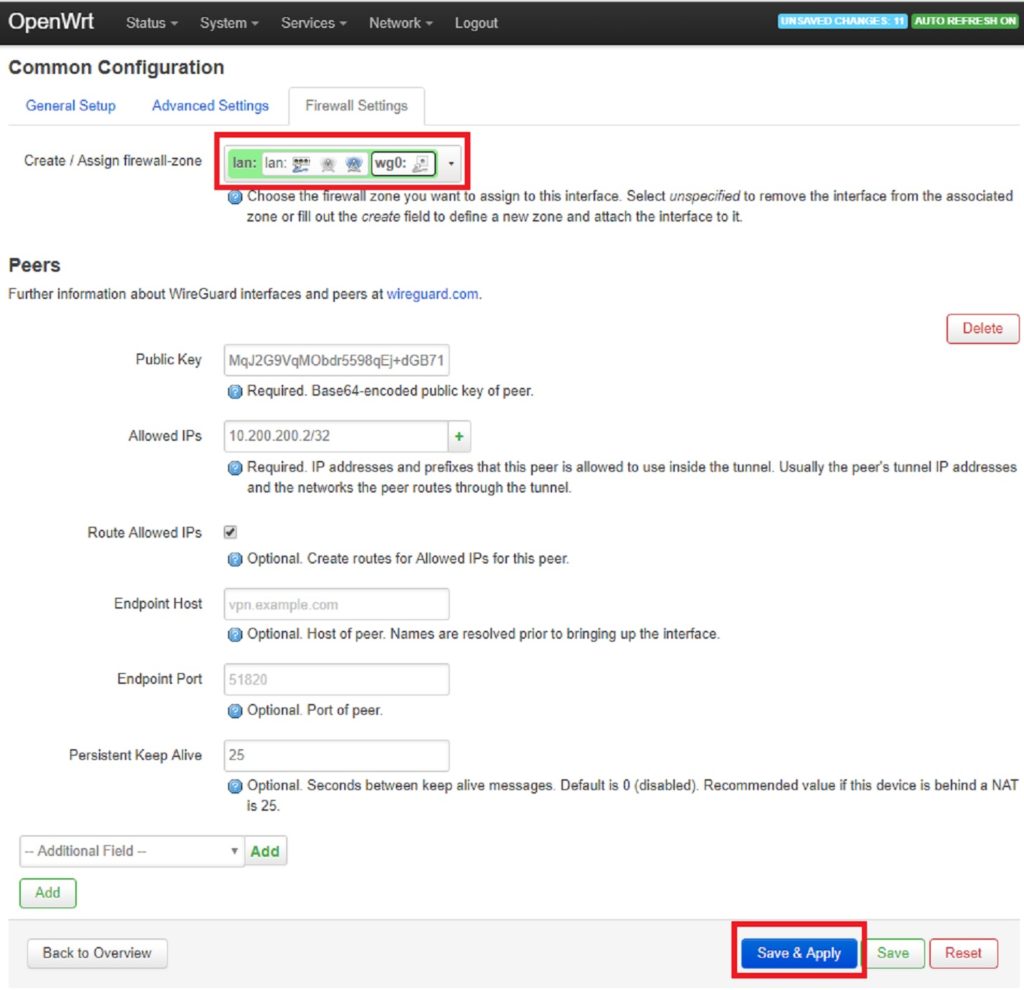
Select Firewall Settings from the top of the page and assign lan zone for the interface then click Save & Apply.
Create firewall rule
Next run the following in SSH to make a new firewall rule in OpenWRT.
Making sure your change port 51820 to match what you selected earlier if you changed this:
uci add firewall rule
 uci set firewall.@rule[-1].src="*"
 uci set firewall.@rule[-1].target="ACCEPT"
 uci set firewall.@rule[-1].proto="udp"
 uci set firewall.@rule[-1].dest_port="51820"
 uci set firewall.@rule[-1].name="Allow-Wireguard-Inbound"
 uci commit firewall
 /etc/init.d/firewall restart
Wireguard app
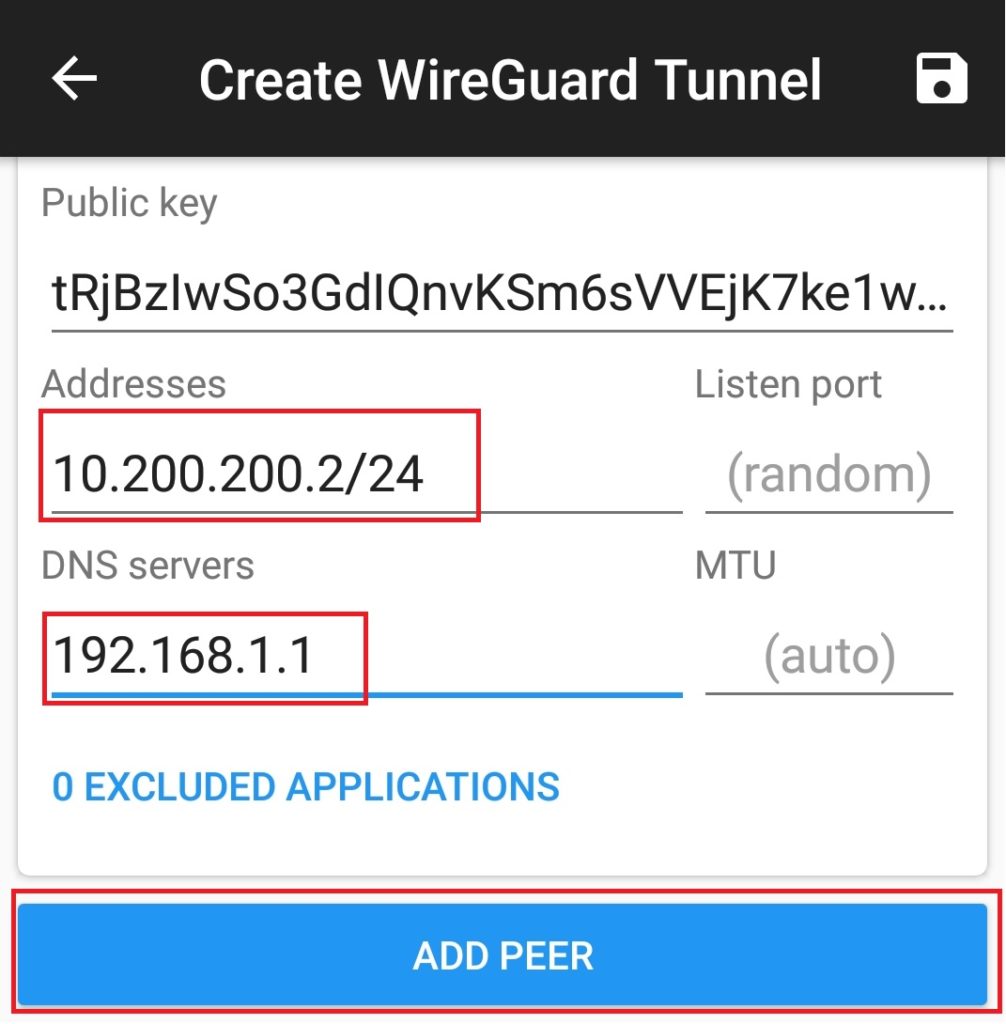
Go back to the app and in Addresses, put the address you chose for the client and entered on the server in the peer Allowed IPs section, but use the real subnet mask (/24 in CIDR notation) like you did for the server Address, e.g. 10.200.200.2/24. In DNS servers, put the router’s LAN IP address in and select ADD PEER. Don’t touch Listen port and MTU unless you know what you’re doing.
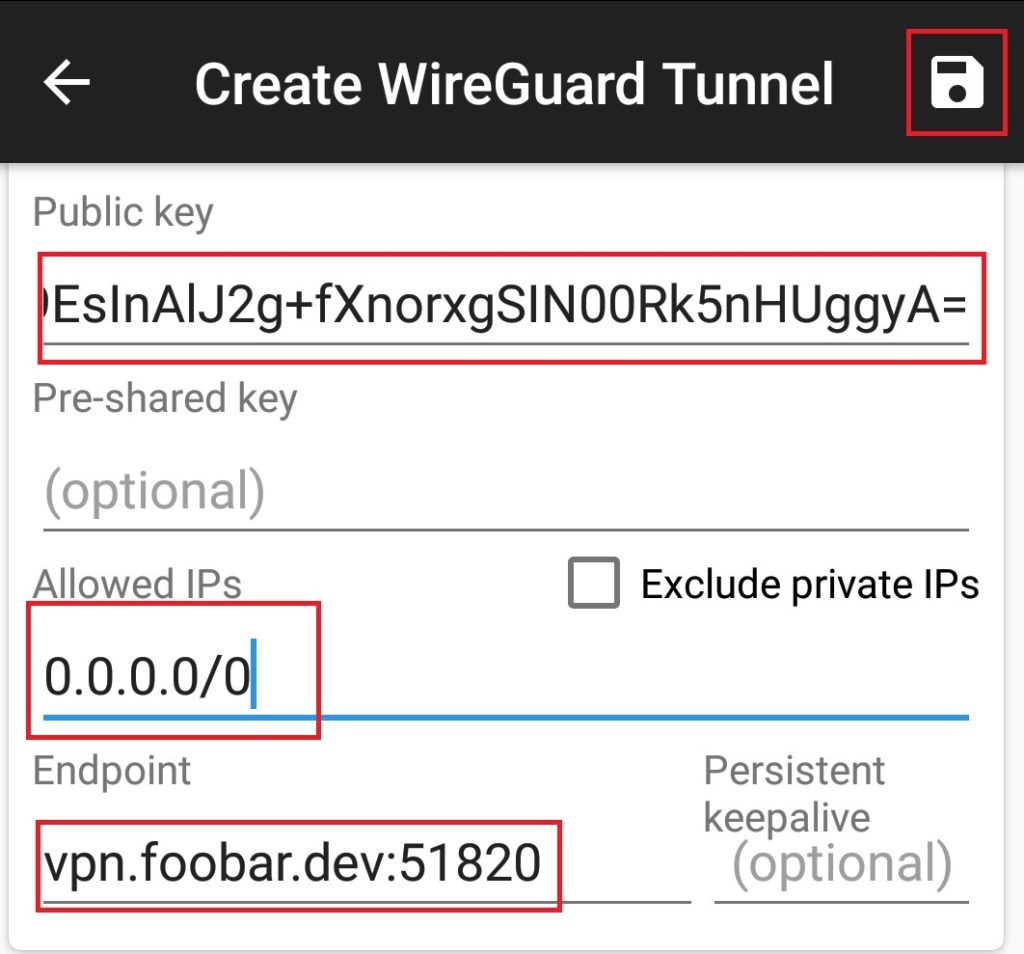
In the Public key section paste in the public key you obtained from /etc/wireguard on the openwrt router earlier and enter 0.0.0.0/0 into Allowed IPs. In Endpoint, specify the router’s WAN IP address or a domain name, ending with :port. For example vpn.foobar.dev:51820. Leave the rest default and hit the save icon.
You should now be up and running. If you have trouble connecting, restart your router and check settings if still not working.
Hi,
Did as instructed and everything works like a charm.
Only that from the client, I cannot acces other PCs on the server’s lan.
From another tutorial (www.stavros.io/posts/how-to-configure-wireguard/), I’ve seen thats theses lines needs to be added to the server’s config to enable this feature :
PostUp = iptables -A FORWARD -i %i -j ACCEPT; iptables -A FORWARD -o %i -j ACCEPT; iptables -t nat -A POSTROUTING -o eth0 -j MASQUERADE
PostDown = iptables -D FORWARD -i %i -j ACCEPT; iptables -D FORWARD -o %i -j ACCEPT; iptables -t nat -D POSTROUTING -o eth0 -j MASQUERADE
I am really not a “command line” expert as I use windows and not linux.
How can I add what these lines means by using Luci’s interface?
Max, If you simply sftp into your router and locate /etc/wireguard/wg0.conf you should be able to edit this with notepad and input the code mentioned in the interface section, overwrite and restart router. This should do the trick.
Hope this helps
Damn it, thank you for all of this ! It’s well explained and finally i’ve succeded to make it work, all other tutorials are really not easy if you are a novice.
Cheers! Glad it’s helped you out
The secure connection is between the client (Android device) and the OpenWRT router? Would the use case for this be if there’s an OpenWRT router somewhere on the Internet which proxies all of the client’s traffic?
I would expect one would more likely want to have a home OpenWRT router connect to a wireguard server on the internet. Any thought on why the first scenario was chosen would be helpful, thanks for this post!
Hey twofish, I chose this option to allow me to connect to my home network whilst away to access files and be on the same IP range. There’s obviously other ways to achieve this and is personal preference. I am in no way an expert on this but thought I would share the settings to help others wanting the same kind of set-up as a lot of sites showing set-up didn’t work for me.
Nice tutorial, but the uci commands for firewall doesn’t seem to work anymore.
uci set firewall.@rule[-1].src=”*”
zsh: no matches found: firewall.@rule[-1].src=*
I had to do it over luci at the end.
Also, for my case, I have to add a port forward rule to forward my router’s WG port to the port on WAN, so that I can actually use the vpn over WAN. I wonder how you can use it without doing so. Did I miss something?